A first look at the program GUI
While we don't present all functions and modes in the program, we give a functional explanation of how to use it in a practical case. But keep in mind that as this is the first attempt to explain how you generate a sequence, it won't use all shortcuts and facilities to do so, nor advanced features. For that, please read later sections in this help file.
Depending on whether you have downloaded a raw zipped version, or have a CD-ROM with the setup version, the installation of Hypervideo Generator is not the same. In both the program is named HyperGen.exe. For the zip version owner : search for it on your hard drive, and make a shortcut on your desktop. For the setup version owner : just click on Start/Programs/Hypervideo Generator.
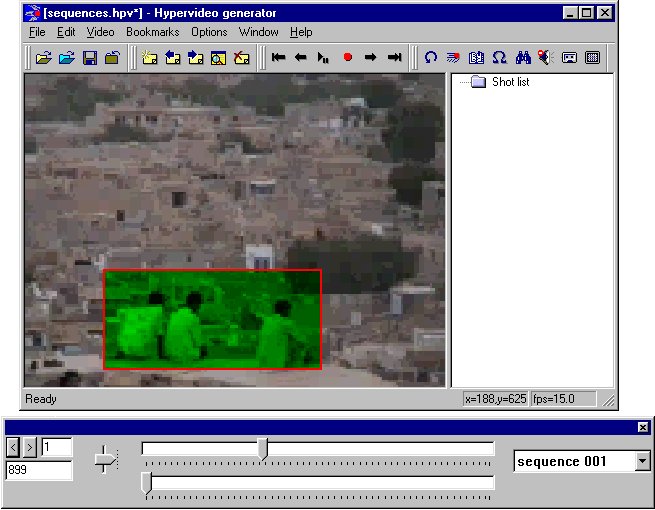
The program launches. It's a SDI application. It consists of a single window splitted into two parts plus a dockable toolbar with necessary video controls.
The left part is the video window, it's here that everything happens !! Generate sequences using your mouse, and Verify a recorded sequence by playing the video and using other standard or advanced video controls.
The right part is the shot management window. The shot engine would fill the tree control with all shot-sequences found, and you may use a go-to functionality or even alter the list with dedicated controls. See the shot engine documentation.
A first look at the program GUI
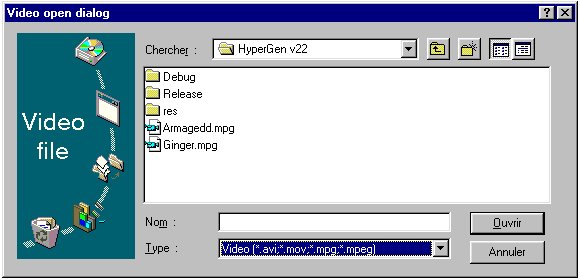
Go to the file menu, and select the OPEN VIDEO FILE option. A standard video-open-dialog lets you choose a video file in any of your drives.
The video file, if ok, is opened and associated to the hypervideo data. Its name will be saved into the HPV file. Of course, it is possible to open another video file for the current hypervideo data but that would be a bit silly. The fact that the OPEN HYPERVIDEO FILE and OPEN VIDEO FILE are two distinct functions is that when you start HyperGen, or when you close the current hypervideo file, you work with an empty hypervideo context, and needs to associate a video to it before proceeding, and at any moment you may wish to open another hypervideo file.
Let us tell you that the video layer used in Hypervideo Generator is the Microsoft DirectShow API. It means high performance scalable video playback and high interactivity. It also means that you can work with an expandable set of video media types since DirectShow allows installation of new codecs. Core codecs for DirectShow 5.0 are AVI, MOV (non-proprietary QuickTime), MPEG-1 and Video-CD DAT files.
Your video file may not be supported, it depends only on your machine and you may find a solution downloading an updated version of the run-time.
The video window can be stretched at any moment using the standard window functionalities.
The video is automatically started. You may start and pause the video playback whenever you want by pressing the SPACE BAR. You may do this with the video menu, and select the Play/Pause command. If you select Stop, then when you restart the video it will start from the beginning and not from the current point.
The toolbar exposes the main seek controls over the video. Let's have a look at the following screen capture.

At the right is the sequence selection combo-box. It lets you drop down the list of available sequences and choose one of them. When you have the focus on this control (the background color changes), you can use the up and down arrows to select the previous or next sequence in the list. Changing of sequence has the inner consequence of telling the program that immediate new hotspot displays and manoeuvres should concern this sequence and no other. The program doesn't prompt you with warnings or stuff like that. Remember that this combo-box is the only control showing you what sequence you are dealing with. You can apply standard operations on a given sequence, see advanced topics.
There are two horizontal sliders. The upper one shows the position
of the current decompressed image of the video, and allows interactive seeks.
You can drag the slider to the desired position, with the left mouse button.
The program will uncompress and show the corresponding image as you drag. When
you release the mouse button, the video restarts if it was playing at the moment
you started dragging. When you have the focus on this control you can either
: click anywhere on the slider to perform a "page" seek, by analogy
with the scroll bars, or you can use the left and right keyboard arrows
to step backward or forward in the video.
This slider can't be stretched. It has the same width whatever video amount
of frames. Moreover, the most left position of the slider is always the first
frame of the video, ie frame 0.
The slider comes with a background "selection bar". After having selected both a mark-in frame and a mark-out frame for the current sequence, it will turn in blue the portion of the video which corresponds to the sequence.
The other slider can be regarded as a zoomed version of this selection bar, and allows interactivity, unlike the selection bar. It means you can perform raw seeks, and dragged seeks inside the sequence. The slider is very useful in fact. First of all, you can concentrate on your sequence, and leave the upper slider for a while. After some work, if you think that the mark-out should be placed a little later than the current position, no problem : seek in the video using the other slider, then set the mark-out, and automatically the down slider will adapt to the new "size" of the sequence. You can do the same with the mark-in.
But remember one thing, if instead of putting a mark-out more to the right, you put it more to the left, then you apply a cut function : the program will tell you that you are about to delete a given number of keyframes, that is a part of the sequence. If you confirm it will be deleted, and won't be recovered anymore. This functionality is a built-in CUT PROCEDURE. There is no such option in the EDIT menu, so this is the only way to do it.
The down slider is also useful because if the video lasts a lot, and the sequence is short, which happens actually very often, then the selection bar of the upper slider will be ridiculously tiny, and at least not even useable. In any case, the down slider is available and shows a zoomed version.
At the left of the frame position slider, is the frame rate slider. This slider is quite unusual but really useful. It is not a feature of the famous Microsoft Active Movie control since the latter is a pure simple playbacker.You can select the desired speed of the video playback. Since the start and end of the sequence are very often precise positions and since you can't do good job at 25 frames by second, it's actually a good idea to slower the video frame rate when you are working with a video. Upper positions of the vertical slider are slower frame rates. The most upper position corresponds to a tenth of the full frame rate. Try it !!! It's quite impressive since the audio is also slowed by a factor of ten. What awful sounds...The most downer position corresponds to a doubled full frame rate. It's almost only for joke purpose !! The middle position is full frame rate.
Then at the left are 2 edit boxes and 2 push-buttons dedicated to frame seeks. The bottom edit box displays the current frame of the video. This current frame is also displayed in what we call the timecode, on the down-right part of the video window. The upper edit box displays a frame step. This frame step is used when you click on one of the two push-buttons. You go whether leftwards or rightwards. The frame step is also used when you have the focus on one of the two horizontal sliders, and you press left/right arrows on your keyboard. After a while, you will admit that precise seek is easy, accurate, fast and fun, whether the video is short or not. This is not always the case with a lot of video tools using sliders...
Play with the sliders, watch the video and locate the interesting sequence to be tracked. Typically the author has a storyboard telling him what actor to pay attention to. For example, if the concern deals with a tiger, you may track all the sequences in which the tiger appears. And when you save a sequence, don't miss the opportunity to give a concrete name to the sequence, for example "tiger sleeping", "tiger hunting", and so on. To do so, rename the current sequence whenever, by holding the CTRL-R key, or select the function from the sequence toolbar or even the edit menu.
Well we guess you have found something to track starting at frame
fs and ending at frame fs+deltaf. Now say it to the computer !!
At frame fs, go to the EDIT menu, and select SET MARK IN, or more rapidly
press SHIFT-PAGE UP. A green symbol appears then at the upper left corner
of the video window. It displays marks. In this case, the start and end marks
are the same, so you see two small symbols. Now go to frame fs+deltas,
and press SHIFT-PAGE DOWN. This sets is an end mark. You will see a single
symbol since the start and end marks are now different.
Now you can go at the start mark by pressing PAGE UP, or the end mark
by pressing PAGE DOWN. You find the equivalent options in the EDIT menu.
You may also remove a mark with CTRL-PAGE UP or CTRL-PAGE DOWN.
The use of these keys may seem unsual but with little practice it becomes fast and intuitive.

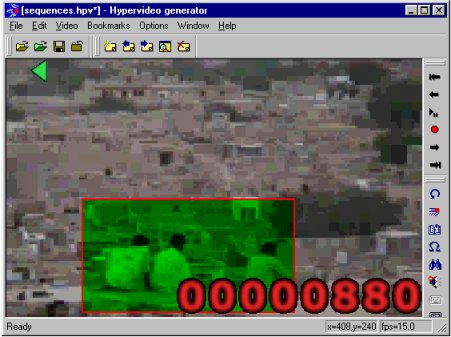
A screen capture demonstrating a start mark
A screen capture demonstrating an end mark
In this example, the sequence starts at frame 755, and ends at frame 880.
We give you the hint to slower down the video using the frame rate slider. So in record mode, you have all the time to move and stretch the active hotspot while the video is playing.
To start recording, press the RETURN key. This function is also in the EDIT menu, and in the video controls toolbar. In record mode, a small circle is displayed in the upper left corner of the video window. The color is either red or white depending on whether the program actually records keyframes or not.
To record a sequence means to record a set of keyframes. What you do is use the mouse with the left button to translate the square, or the right button to stretch the square. In record mode, any frame inside the interval of start/end marks is a compatible frame. Any compatible frame is a keyframe internally stored as the record goes on.
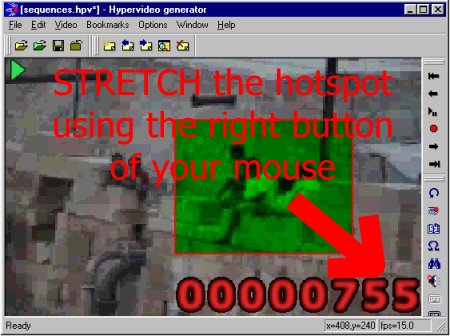
The stretch functionality
The stretch functionality can be reversed if you use the SHIFT key when you stretch. Try it !!
At the user level, you can see that the current frame is being stored since the small circle is white. Whenever the frame is outside the marks interval, the small circle becomes red, and then it is no use to play with your mouse, even if you are in record mode. The circle becomes red and the record mode is automatically cut down if you have reached the end of the sequence. This discharges you to press the RETURN key. Records are thus stopped automatically. But you will soon learn that a record mode can be automatically started too. All in all, it's very like the record mode is automatical. This is what we are dealing with when we speak about production-oriented GUI.
You can pause the video whenever you want. In record mode, if the circle is white, it means that the program will replace the existing keyframe with a new one, representing the current shape of the hotspot : remember that whether you are in PLAY or in PAUSE, you can always move or stretch the hotspot. You can also use freely the sliders, perform seeks, and so on... It won't break the record mode or even provoke a failure in the program.

The white circle at the upper left corner tells that the program actually
records this frame
You may pause the video, reposition the square, then restart the video. You may also track the whole sequence once, then go at the start mark and retrack the sequence. While you are allowed to do this, you must know that the program will actually add non existing keyframes to the set of keyframes obtained after the first pass, and will replace existing keyframes with new positions obtained in the second pass. In this case, you can't speak of sequence generation, but more of sequence correction.
Please note that at any frame inside the begin-end marks, you may restart a record, track a moment, then stop the record either on your own, or let the program do it himself. It's thus a good solution to correct an unsufficiently precise sequence of hotspots.
There is still stuff to see !! The set of sequences you have in memory at the moment can be of course stored on disk, either for future load into HyperGen, or for reuse in another program. Go to the file menu, and select the option SAVE SEQUENCES, or SAVE SEQUENCES AS, or more practically press either CTRL-S or SHIFT-CTRL-S.
The program opens a browser dialog which lets you give a name for the script file, container of all the sequences. The script file has a specific extension name, HPV. HPV stands for hypervideo. It doesn't really matter since it is a textual content intended for brutal reuse. But anyway.
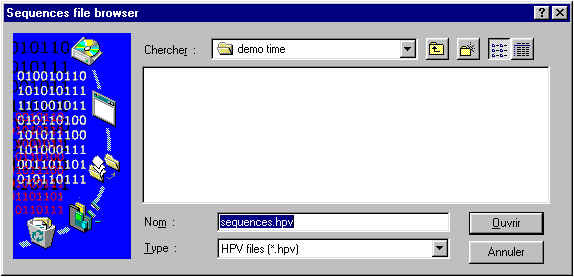
Before you proceed (you can push the CANCEL button), you should know that any of the sequence doesn't come only with a set of hotspots. It also have a couple of properties, which have default values. You can act on any of these public properties for a given sequence.
Now for the name, any time you create a new sequence, a name is automatically generated. It is "sequence XXX", where XXX is a number to distinguish a sequence from another. A sequence name can be customized. The natural names are "sequence 001", "sequence 002" and so on...But if you rename a sequence to "tiger", and add another sequence it won't be named "tiger 002" or anything else. At least, the program makes its possible not to let you have two sequences with the same name.
Press Ctrl-R to show a dialog box to customize the current sequence.
As most of the mentioned parameters are obvious, I can stress a little bit more on that interpolation engine. In fact, the video playback is often fast enough to leave blank frames between keyframes, therefore the set of keyframes is not continuous with respect of the frame timeline. To avoid this, if you wish to have the maximum set of frame, you have two solutions : first slower the video a bit more when you are in record mode. Second solution fitting our case study : check the box entitled "Save also interpolated in-between frames". The program will generate virtual in-between frames at the place of those blank frames using a linear interpolator. The program will then save all keyframes and all interpolated frames between the keyframes, resulting in a continuous frame sequence. Depending on the application you impact, I guess this may be helpful. Please note, that the notion of keyframes is usually seen as a better model than raw continuous frames since a lot of potentially useless frames will be saved. For instance, if a motion is linear, it is obvious that the start and end keyframe of this motion represents the same information than the whole motion being sampled at an arbitrary rate. In the first case, the information is optimized but access to an in-frame require a mathematical calculation, thus a waste of CPU time. In the second case, it causes an arbitrary huge waste of memory but with easier control and access to any intermediate frame. We let you decide.
Please note the interpolate yes/no mode is "saved" and used for any subsequent sequences.
When the sequences are saved, you may save it once again if you wish. The program won't boast telling you you are saving the sequences twice !!! The fact that you save sequences twice is not necessarily silly since the first time you may save only keyframes, and the second time all the interpolated frames.
When you quit the program, the program checks whether you have worked with sequences and it needs be stored on disk, and tells you to if so.
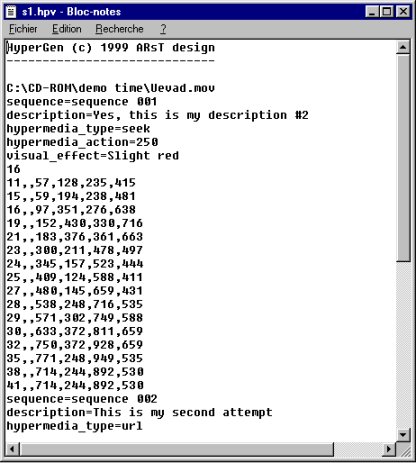
An example of raw sequence. Note the header block at the beginning of the
file.